-

Customer Experience -

Employee Experience -

Brand Experience -

Core XM -

Design XM
XM Directory Segments for Digital Intercept Targeting
About XM Directory Segments for Digital Intercept Targeting
XM Directory allows you to target the display of website and app intercepts to specific segments of users, as well as obtain segment- and journey-specific insights. With the combination of the XM Directory and Website / App Feedback, you can engage with your highest-value customer segments for specific experience measurements. An event in your visitor’s XM Directory touchpoint timeline will be created each time your intercept is displayed to your visitor.
Before you can use this feature, XM Directory automatic de-duplication should be enabled for the External Data Reference field to ensure each contact has a unique value.
Setting up Segments for Intercept Targeting
Once you’ve created segments in XM Directory, you can use them across Qualtrics in many of the same places that mailing lists and samples can, including with Website / App Feedback.
- Create an intercept on an existing or new Website / App Feedback project.
Qtip: If, instead of creating a standalone intercept, you’d like assistance throughout the whole process, feel free to use our guided setup for Website / App Feedback projects. If you use the guided setup, you will be prompted to add a creative, connect your survey, and configure your intercept. For more information about the guided setup, visit Choose How You Want to Collect Feedback.
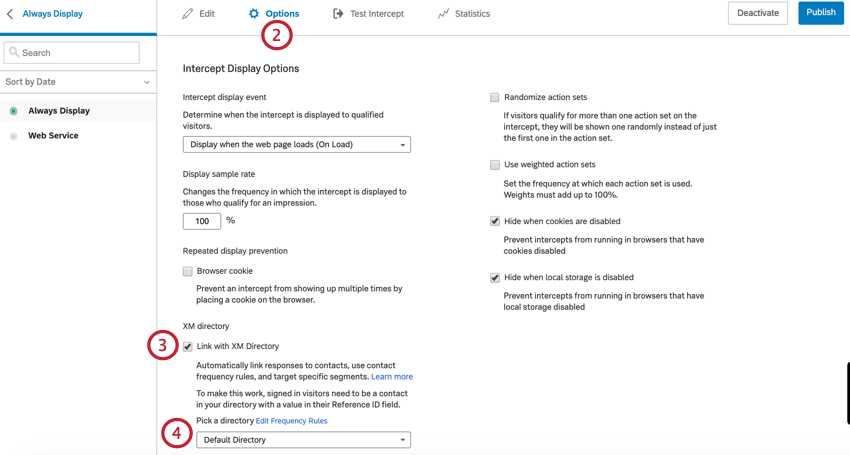
- Navigate to the intercept Options.
 Qtip: The steps are the same on mobile app intercepts, but you will see fewer intercept options.
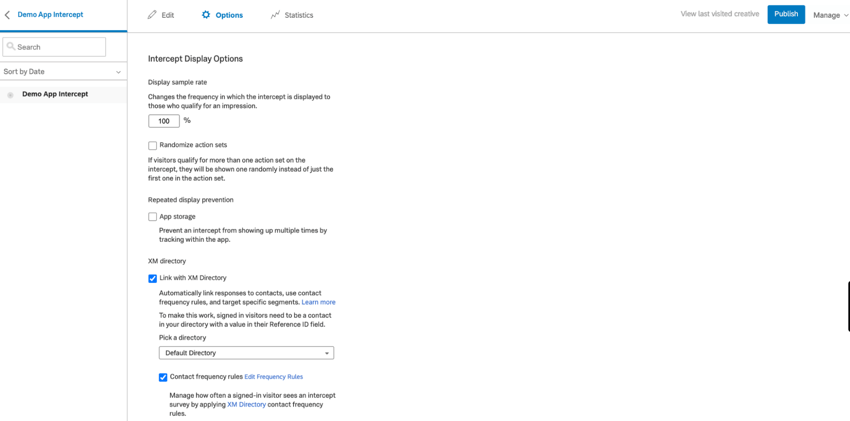
- Enable “Link with XM Directory” by selecting the checkbox.
Qtip: When this option is selected, contact embedded data for users that take this survey will automatically be added to their survey response. See Using Embedded Data with XM Directory.
- Pick the directory that contains your segments.
Qtip: You can also control intercept display frequency with the Contact Frequency Rules feature. To set this up, see XM Directory Contact Frequency for Digital Intercepts.
- Return to your intercept editor, and add targeting logic that contains your XM Directory segment.
Example: For example, XM Directory Segment Is High-Value-Users.Qtip: On website intercepts, you can test the intercept using the bookmarklet both with contacts that are in the segment and with contacts that are not in the segment. During testing, you’ll have to mimic the setting of the External Reference ID within your browser so Qualtrics can identify the contact. See Testing the Use of Segments for Intercept Targeting for more information.
- The next steps differs based on whether you are implementing this functionality on a website or a mobile app.
- Website: On your website where you will launch the intercept, specify the JavaScript expression that will be evaluated in the user’s logged in session to obtain the External Reference ID for the contact. This External Reference ID is used to look up the visitor in the XM Directory and track if they’ve seen your intercept. See the below section for more details on the JavaScript expression.
- App: On the app where you will launch the intercept, you will need to make an update to your mobile app SDK in order to retrieve the reference ID. See the API documentation.
JavaScript Expression for Retrieving Reference ID on a Website
To make sure your intercept is obeying your segment targeting, you will need to specify the JavaScript expression that is evaluated in the user’s logged in session to obtain the External Reference ID for the contact.
The logic below passes the externalReference ID of the user to Qualtrics to associate the website visitor with a contact in XM Directory. Put this code snippet on page load, making sure that the value of the ID has been retrieved at this point:
if(typeof QSI === "undefined") {

    QSI = {};

    QSI.config = {

      externalReference: extRef

    };

}Testing the Use of Segments for Website Intercept Targeting
Before launching your intercept on your website, you should test it to make sure the display based on segment targeting has been implemented correctly.
In your real deployment, your site visitor’s External Reference ID will be available in the context of their logged session through a JavaScript expression or a cookie.
The below steps allow you to perform an end to end scenario using test data and web browser workarounds.
- In your XM Directory, create a new contact and specify a unique Reference ID for that contact.
Example: We’ll be using aaa123 as our example Reference ID. Any time you see the ID number in these steps, replace it with the Reference ID you specified.
- Follow the steps in the Setting up Segments for Intercept Targeting section to configure an intercept to follow segment targeting.
- Go to Test Intercept.
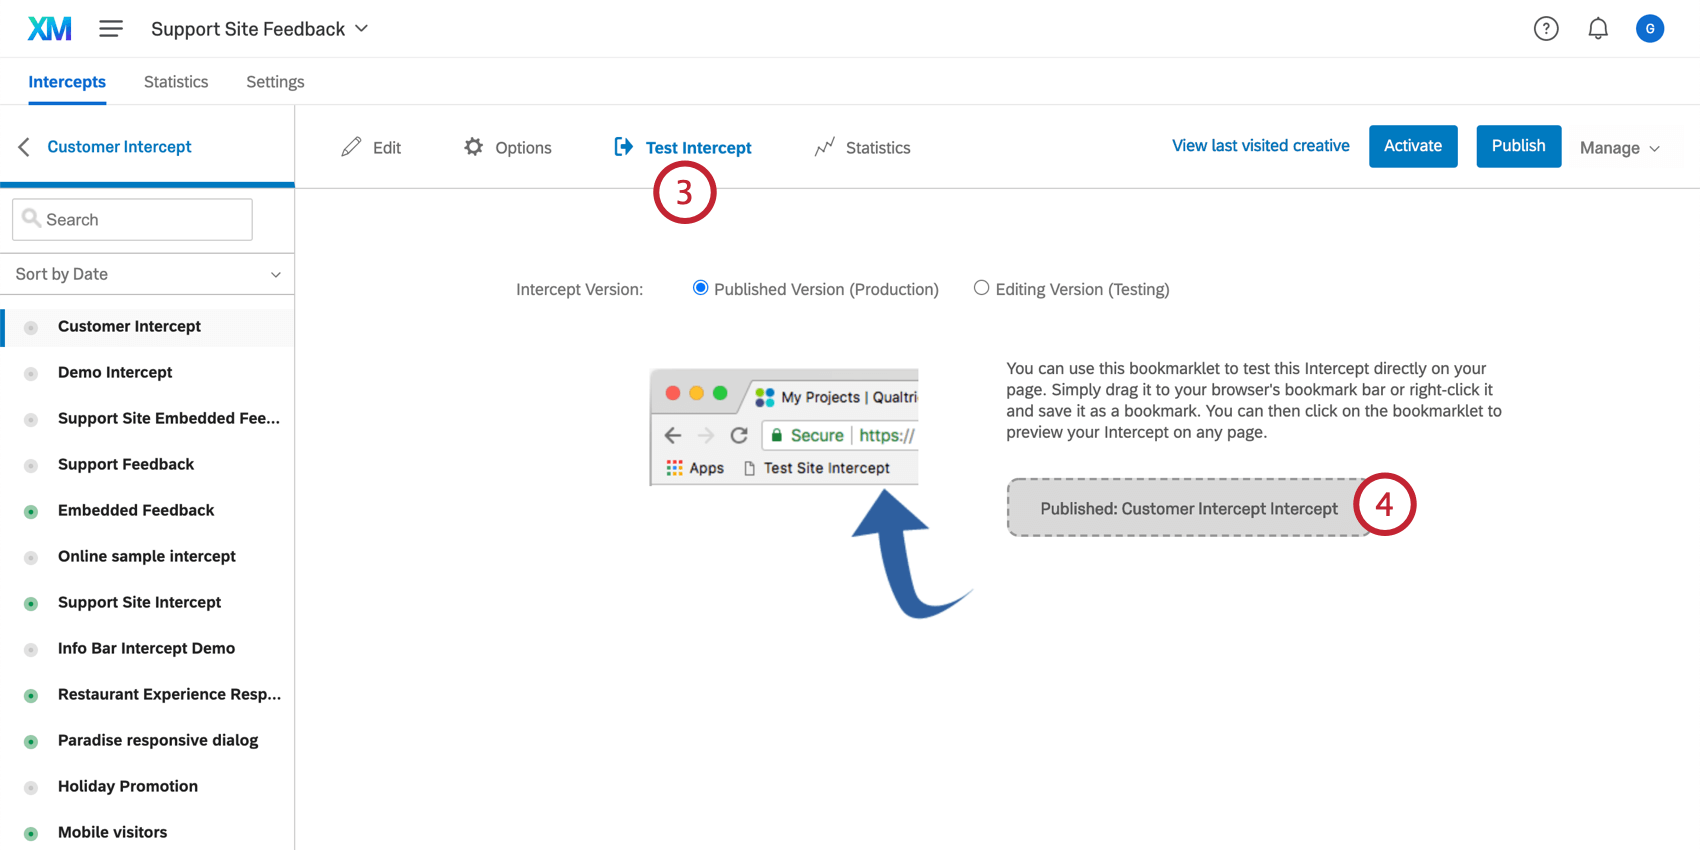
- Drag the bookmarklet to your browser’s bookmarks bar.
- Go to a web page that you want to use for testing.
- Go to the Developer Console. Depending on your web browser, you’ll reach it differently:
- Google Chrome: In the Chrome menu bar, go to View → Developer → Developer Tools. In the window that appears, go to the Console
- Apple Safari: Ensure the Develop menu is enabled for Safari. To do this, go to Preferences → Advanced → Show Develop menu in menu bar. Click Develop in the Safari menu and select Show Web Inspector. In the window that appears, go to the Console
- Mozilla Firefox: Click the menu icon and then select Web Developer. In the Web Developer menu, select the Console
- Microsoft Edge: In the menu bar, go to Tools → Developer → Developer Tools. In the window that opens, go to the Console
- Internet Explorer: Click the Gear icon and select Developer Tools. In the window that opens, go to the Console
- In the Console menu, type this expression and then press Enter:
UserID="aaa123"
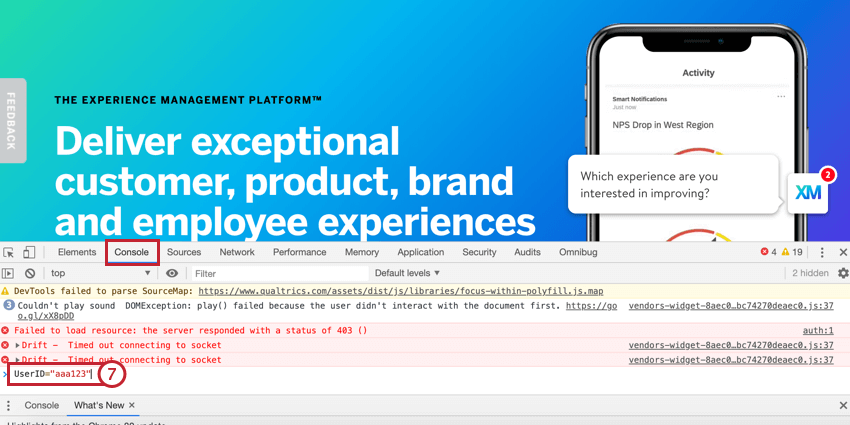 Qtip: aaa123 is our example Reference ID value and should be replaced with the value you assigned to the contact in step 1.
 - Paste the JavaScript snippet below to set up the externalReference JavaScript variable to be your JavaScript expression.
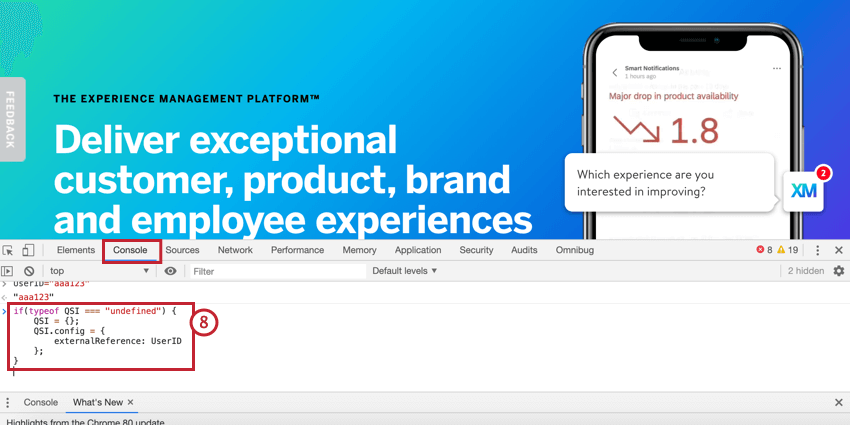
if(typeof QSI === "undefined") { QSI = {}; QSI.config = { externalReference: UserID }; } - Press Enter.
- Click the bookmarklet and you will see that the segment targeting will be appropriately honored to determine if the intercept should or should not be displayed.
Qtip: For security purposes, the targeting logic line that includes the segment will only include the segment ID. To match a segment ID to a segment name, navigate to XM Directory and edit your segment. The URL will have the segment ID, which is bolded in the following example URL: https://dxdemo.co1.qualtrics.com/iq-directory/#/POOL_2QRmx18nJXf6kuR/segments/SG_1hHhxvjX3PAZ34k
To repeat these steps for additional testing, please do the following between tests:
- Refresh your browser each time.
- Set up the JavaScript expression within your Console.
- Run your bookmarklet again.
Retrieving Reference ID on an App
In order to retrieve the Reference ID for a mobile app intercept, you will need to make an update to your mobile app SDK. See the API documentation.
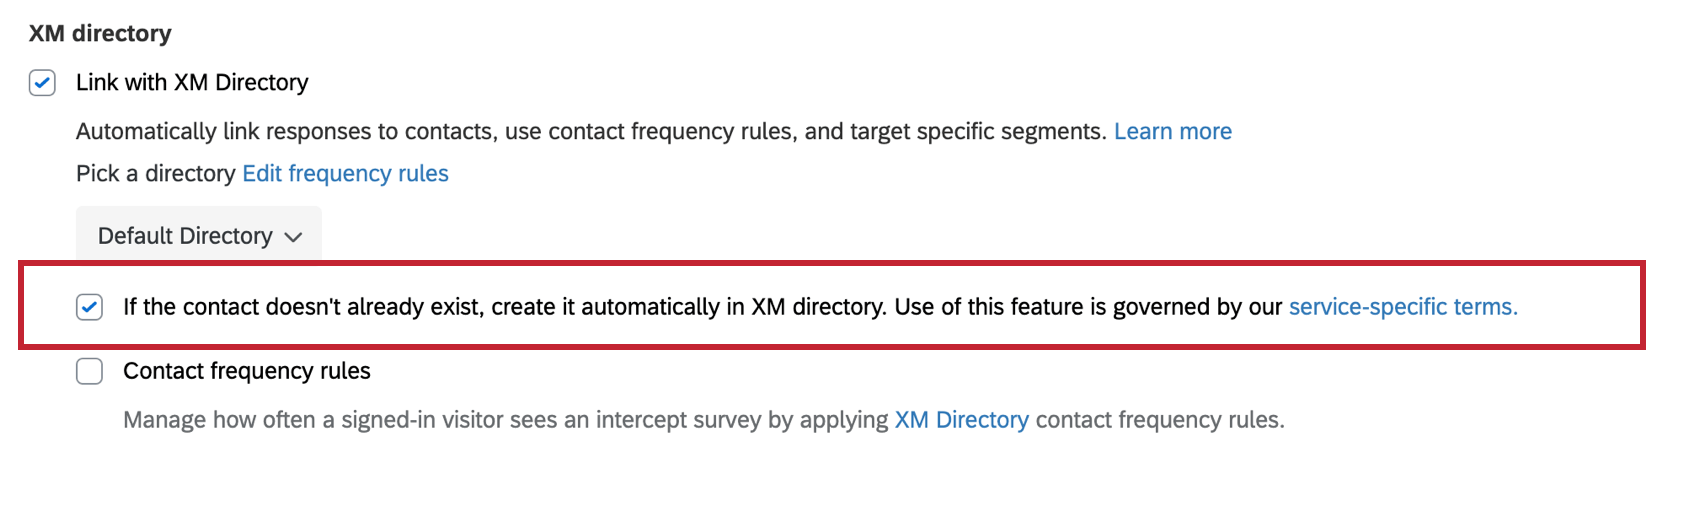
Automatic Contact Creation
XM Directory contacts can be created each time users visit web pages with intercepts on them. This option enables adding contacts automatically when an intercept is evaluated, eliminating the need for manual file uploads or SFTP based automations.
To enable automatic contact creation, you must first link the intercept to the XM Directory. Then, click the checkmark next to the option that says If the contact doesn’t already exist, create it automatically in the XM directory.
You will need to work with your website development team to add code in order to send contact information into the directory using API. For more information, see our API documentation on creating a directory contact, or creating a contact in a mailing list. This expression is the same as the segment functionality and can be found in this section on JavaScript.
You can add the following information for each contact:
- First Name
- Last Name
- Language
- Additional key value pairs (e.g. “Location”:”Seattle”,”Gender”:”Female”). You can add up to 200 pairs
TESTING CONTACT CREATION USING WEB INTERCEPTS
Before launching your intercept on your website, you should test it to make sure the display based on segment targeting has been implemented correctly.
- Open one of your existing intercepts or create a new intercept within a Website / App feedback project.
- Edit the Display frequency and XM Directory options.
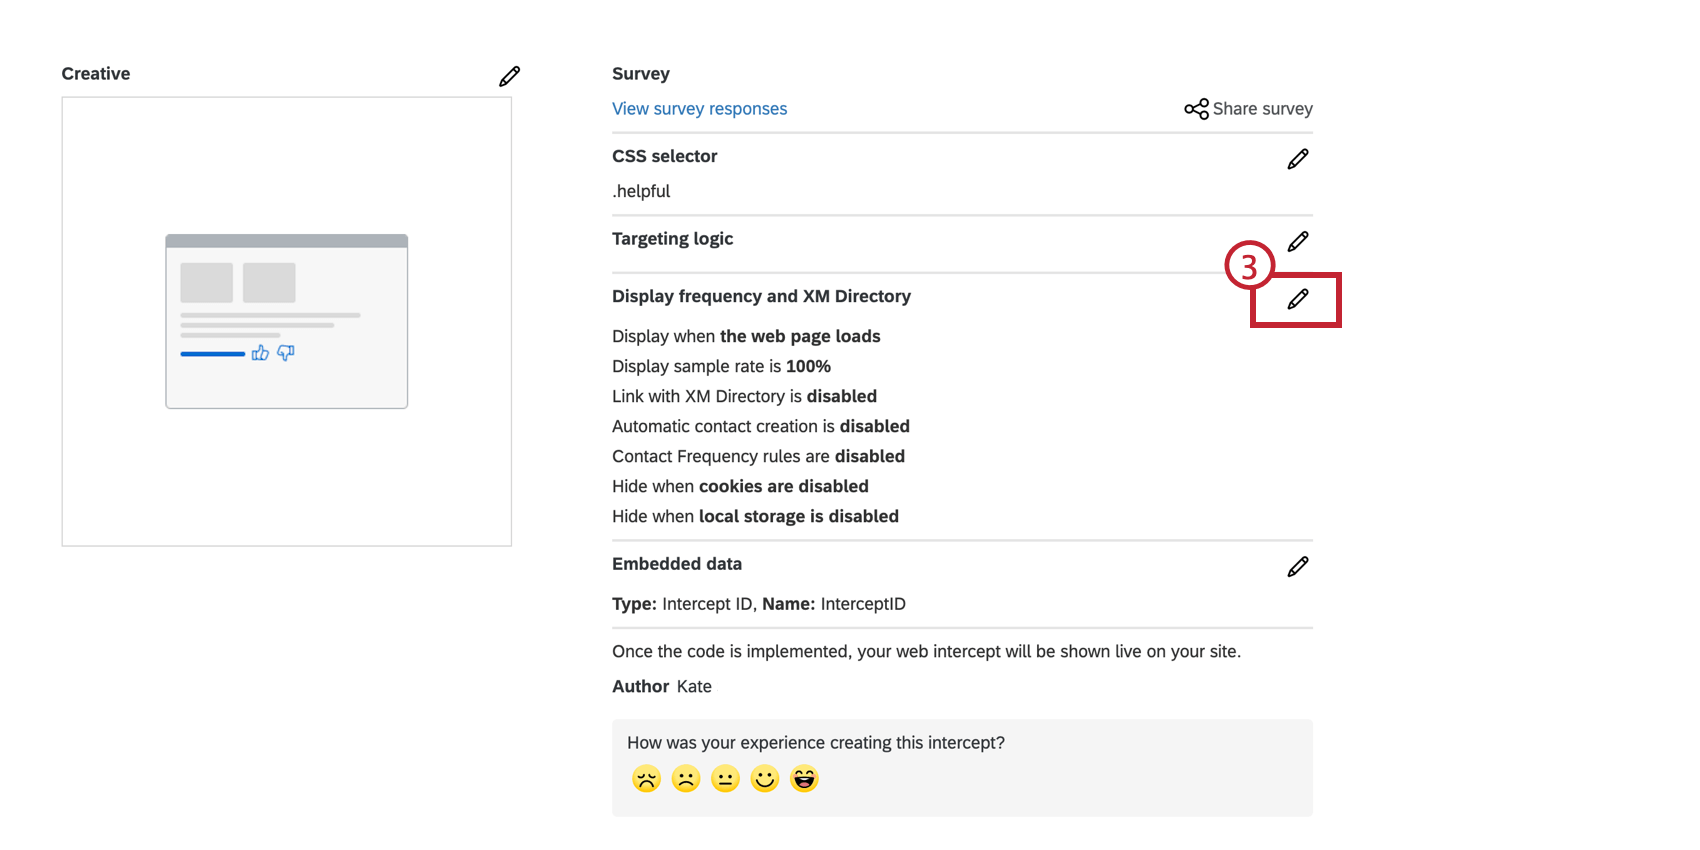
- Enable Link with XM Directory.
- Choose a directory from the dropdown list.
- Click the checkbox next to If the contact doesn’t already exist, create it automatically in XM directory.
- Click Save.
- Click Preview intercept.
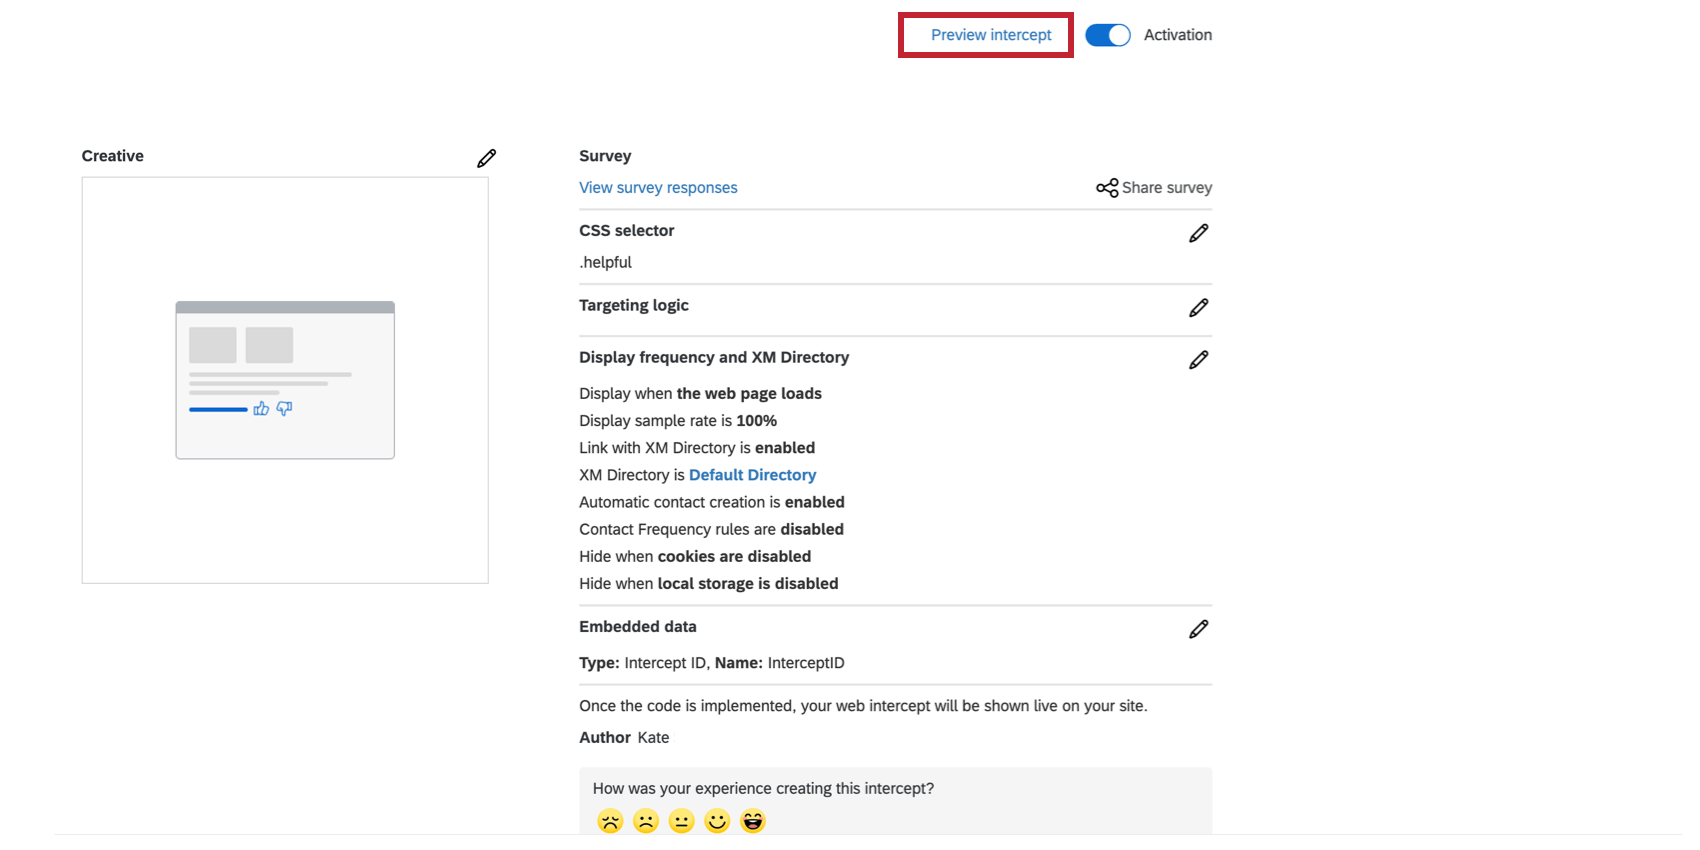
- Drag the bookmarklet to your browser’s bookmarks bar.
- Go to a web page that you want to use for testing.
- Go to the Developer Console. Depending on your web browser, you’ll reach it differently:
- Google Chrome: In the Chrome menu bar, go to View → Developer → Developer Tools. In the window that appears, go to the Console
- Apple Safari: Ensure the Develop menu is enabled for Safari. To do this, go to Preferences → Advanced → Show Develop menu in menu bar. Click Develop in the Safari menu and select Show Web Inspector. In the window that appears, go to the Console
- Mozilla Firefox: Click the menu icon and then select Web Developer. In the Web Developer menu, select the Console
- Microsoft Edge: In the menu bar, go to Tools → Developer → Developer Tools. In the window that opens, go to the Console
- Internet Explorer: Click the Gear icon and select Developer Tools. In the window that opens, go to the Console
- In the Console menu, type this expression with example XM Directory contact values, and then press Enter.
QSI = {config: {externalReference:"test123", contactEmbeddedData: {"Location":"Seattle"}, language:"English", firstName:"Jane", lastName:"Smith"}}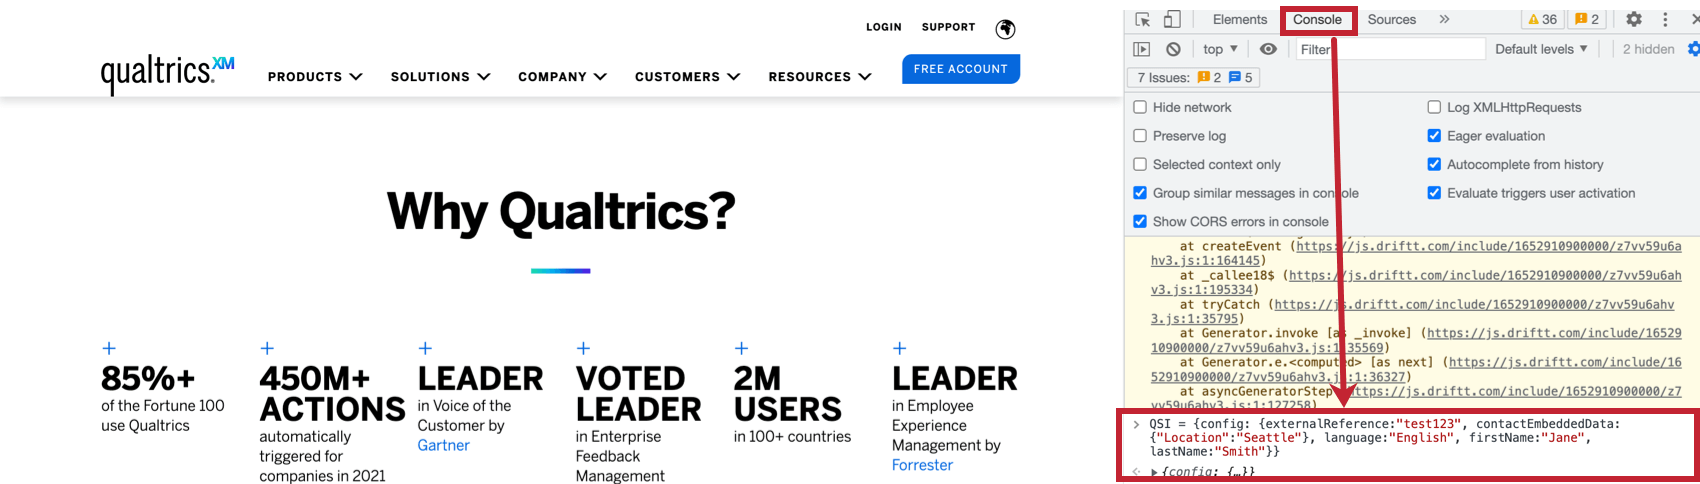 Qtip: The values in this expression are examples for contact values that will be added to the test contact’s XM Directory profile. You can change these values to whatever you would like.Attention: We do not support email addresses as profile attributes in order to preserve highly secure web intercepts. You can add email addresses manually through the directory or by file uploads and SFTP automations.
 - Click the bookmarklet and you will see that the intercept will be displayed.
Qtip: The intercept does NOT have to be displayed in order for the contact creation to work. It just has to be evaluated on the page.Qtip: Other XM Directory functionality such as segment targeting or contact frequency rules will not work as part of the same page load as the one where the contact profile was created. However, once the contact is created, any subsequent intercepts will evaluate contact frequency and segment targeting rules.
- Navigate to the XM Directory indicated in the dropdown of step 3 and validate that the contact has been created with the values input in step 9.
Troubleshooting Tips
A new user was added to segments, but doesn’t see an intercept that was targeted at their segment.
Segments are rebuilt daily in XM Directory. Therefore, there is a possibility the new user was not yet accounted for as a member of the segment.
The intercept debugger window does not show segment names.
For security reasons we do not show the segment name in the debugger window for any targeting logic that has segments. We will show the segment ID. To map a segment ID to the segment name, edit your segment in XM Directory and look at the URL. The URL will have the segment ID, which is highlighted in the following example URL: https://dxdemo.co1.qualtrics.com/iq-directory/#/POOL_2QRmx18nJXf6kuR/segments/SG_1hHhxvjX3PAZ34k
Alternately, you can directly open up an Intercept and examine the targeting logic to see what segments are being targeted.
The intercept is slow to show up for first time users.
For performance reasons, we temporarily store segment membership in-memory and only update it as needed. If a user is not yet in our temporary storage, then that user’s intercept may take a bit longer to display initially.